
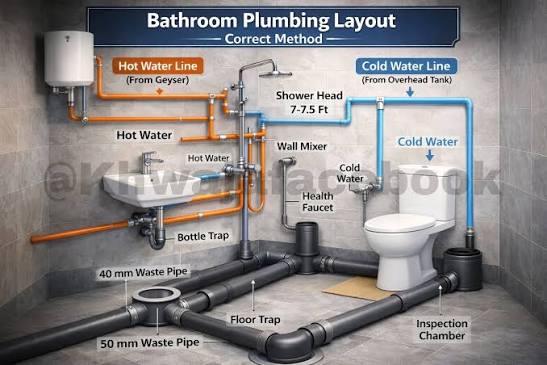
A bathroom plumbing diagram is a simple visual plan that shows how water supply lines, drain pipes, vent pipes, traps, valves, and bathroom fixtures connect behind the walls and under the floor. It helps homeowners, remodelers, and plumbers understand how a bathroom works before installation, repair, or renovation begins. Whether you are planning a new bathroom, replacing a shower, moving a toilet, or trying to solve a slow drain problem, a clear plumbing diagram can save time, money, and stress.
At first, bathroom plumbing looks simple. You turn on a faucet, flush a toilet, or take a shower, and the system seems to work on its own. However, behind the finished walls, several parts must work together. Clean water must reach each fixture. Wastewater must leave through properly sloped drain lines. Vents must balance air pressure so the drains flow smoothly and sewer gases do not enter the room. If one part is missing or poorly planned, the bathroom may develop leaks, clogs, odors, gurgling sounds, or drainage problems.
This complete guide explains what a bathroom plumbing diagram includes, how common bathroom layouts work, what pipe sizes are often used, how vents and traps function, and what to check before starting a remodel.
What Is a Bathroom Plumbing Diagram?
A bathroom plumbing diagram is a drawing or layout that shows how the bathroom’s plumbing system is arranged. It usually includes the sink, toilet, shower, bathtub, bidet, floor drain, water supply lines, waste pipes, vent pipes, traps, shutoff valves, and the main drain connection.
A simple diagram may show only the basic location of each fixture and the direction of the drain lines. A more detailed diagram may include pipe sizes, wall measurements, drain slope, vent locations, fixture clearances, and connection points. Professional plumbers often use detailed diagrams to plan the work and check whether the design follows local plumbing codes.
The main purpose of the diagram is to show three things: how clean water enters the bathroom, how used water exits the bathroom, and how the drainage system gets air through vents. These three systems must be planned together. If the supply lines are correct but the drains are poorly sloped, the bathroom will not work well. If the drains are correct but the vents are missing, fixtures may gurgle or smell.
A diagram is especially useful before walls are opened or floors are cut. Once tile, drywall, cabinets, and flooring are installed, plumbing mistakes become much harder and more expensive to fix.
Why a Bathroom Plumbing Diagram Matters Before Remodeling
A bathroom remodel should never begin with fixture choices only. Before selecting tile, paint, lighting, or a vanity, it is important to understand where the plumbing can go. A bathroom plumbing diagram helps you see whether your design is practical.
For example, moving a vanity a few inches may be simple. Moving a toilet across the room can be much harder because the toilet needs a large drain pipe, correct slope, and proper venting. Replacing a bathtub with a walk-in shower may also require changes to the drain location, waterproofing, floor slope, and vent connection.
A clear diagram helps prevent common problems such as slow drains, sewer odors, toilet backups, hidden leaks, poor water pressure, gurgling fixtures, and failed inspections. It also helps reduce surprise costs. When fixtures stay close to the existing plumbing wall, installation is usually easier and less expensive. When fixtures are moved far away, the plumber may need to reroute pipes through floors, walls, joists, or ceilings.
The diagram also helps you communicate with contractors. Instead of saying, “I want the shower over there,” you can discuss supply lines, drain routing, vent access, and fixture spacing with more confidence.
Main Parts of a Bathroom Plumbing Diagram
A complete bathroom plumbing plan usually includes water supply lines, drain lines, vent pipes, traps, shutoff valves, fixture connections, and the main stack or branch drain. Each part has a specific job.
| Plumbing Part | Main Job | Common Fixtures Connected |
| Water supply lines | Bring clean hot and cold water to fixtures | Sink, shower, bathtub, toilet, bidet |
| Drain lines | Carry wastewater away from fixtures | Sink, shower, tub, toilet, floor drain |
| Vent pipes | Balance air pressure and help prevent sewer smells | Sink, toilet, shower, tub |
| P-traps | Hold water to block sewer gas | Sink, shower, tub |
| Shutoff valves | Let you turn off water to one fixture | Sink, toilet, bidet |
| Main stack or main drain | Carries waste toward sewer or septic system | Full bathroom system |
| Cleanouts | Provide access for drain cleaning | Branch drains and main drains |
When reading a diagram, start by finding the fixtures. Then trace the supply lines, drain lines, and vent lines. A good layout should make the path of water easy to follow.
Water Supply Lines in a Bathroom
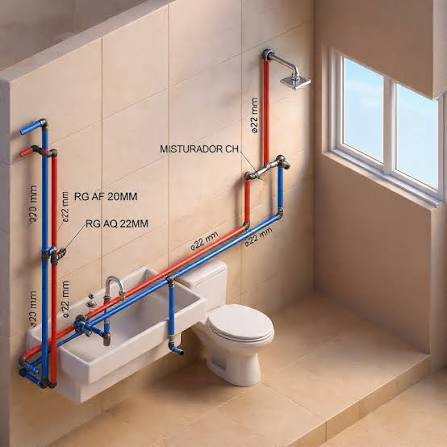
Water supply lines bring clean water into the bathroom. Most bathrooms have hot and cold water lines for the sink, shower, and bathtub. Toilets usually need only a cold water line. Bidets may need cold water, warm water, or both, depending on the model.
Common water supply materials include PEX, copper, and CPVC. PEX is popular in many modern homes because it is flexible and easier to route through walls and floors. Copper is strong and long-lasting, and it is common in many older homes. CPVC and other approved plastic pipes may also be used in some areas.
Most individual bathroom fixture supply lines are commonly 1/2 inch. In some layouts, 3/4-inch supply lines may be used for longer runs or to help maintain pressure. A shower with multiple heads, body sprays, or a high-flow tub filler may need extra planning.
A good plumbing plan should also show shutoff valves. These valves are usually placed under the sink, near the toilet, and close to other fixtures where possible. Shutoff valves make repairs easier because you can turn off water to one fixture without shutting off water to the whole home.
Drain Lines in a Bathroom
Drain lines remove used water and waste from the bathroom. Unlike supply lines, drain pipes rely mostly on gravity. This means slope is very important. If a drain pipe is too flat, water may sit in the pipe and cause buildup. If it is too steep, water may move too quickly and leave solids behind.
Common bathroom drain sizes include 1.5 inches for many sink drains, 2 inches for many shower drains, and 3 to 4 inches for toilet drains. The toilet uses the largest drain because it carries solid waste and a larger volume of water.
| Fixture | Common Supply Pipe Size | Common Drain Pipe Size |
| Bathroom sink | 1/2 inch | 1.5 inch |
| Toilet | 1/2 inch | 3 to 4 inches |
| Shower | 1/2 inch | 2 inches |
| Bathtub | 1/2 to 3/4 inch | 1.5 to 2 inches |
| Bidet | 1/2 inch | 1.5 to 2 inches |
| Floor drain | Not applicable | Usually 2 inches or larger |
These sizes are general planning references. Local plumbing codes, fixture specifications, and the full layout can change the final requirements. Always have a licensed plumber confirm pipe sizes before installation.
Drain lines should also include proper fittings. Smooth turns are better than sharp turns because they help wastewater move more easily. Cleanouts may also be needed so the drain can be cleared if a clog develops.
Vent Pipes in a Bathroom
Vent pipes are one of the most important parts of bathroom plumbing, yet many homeowners do not think about them. A vent pipe allows air to enter the drainage system. This helps water flow smoothly and prevents pressure problems.
Without proper venting, water moving through a drain can pull water out of a trap. Once the trap loses its water seal, sewer gases may enter the bathroom. Poor venting can also cause slow drains, bubbling toilets, gurgling sinks, and unpleasant smells.
A vent pipe usually rises through the wall and connects to a vent stack or exits through the roof. In some homes, vents may connect in the attic or tie into an existing approved vent. Some layouts may allow wet venting, where part of the drain system also helps vent another fixture. However, wet venting must follow local plumbing rules.
A proper bathroom plumbing diagram should show how each fixture is vented. It should also show how far the trap is from the vent connection.
P-Traps and Sewer Gas Protection
A P-trap is the curved pipe under a sink, shower, or bathtub drain. It holds a small amount of water in the curve. That water acts like a seal, blocking sewer gases from coming back into the bathroom.
Sinks, showers, and tubs need traps. Toilets have built-in trapways, so they do not use the same visible P-trap found under sinks. If a bathroom smells like sewer gas, the problem may be a dry trap, clogged trap, damaged seal, poor venting, or incorrect drain installation.
P-traps must be installed correctly. If the trap arm is too long, the vent is too far away, or the trap is not aligned properly, drainage problems can happen. That is why traps should be included clearly in the diagram.
The Wet Wall in Bathroom Plumbing
A wet wall is a wall that holds plumbing pipes. It may contain water supply lines, drain pipes, vent pipes, or the main plumbing stack. In many bathrooms, the sink, toilet, shower, and bathtub are placed close to the wet wall.
Keeping fixtures near the wet wall has several benefits. It shortens pipe runs, reduces labor, makes venting easier, and can lower remodeling costs. It also makes future repairs simpler because the plumbing is grouped in one area.
For example, in a compact bathroom, the vanity, toilet, and shower may all sit along one shared plumbing wall. This layout is common because it saves space and keeps the system efficient.
When planning a remodel, try to identify the wet wall first. If you can keep major fixtures near that wall, the project will usually be easier.
Standard Full Bathroom Plumbing Layout

A standard full bathroom usually includes a sink, toilet, shower, and bathtub or tub-shower combination. In many homes, these fixtures connect to one main branch drain before wastewater moves toward the main stack or sewer line.
A common full bathroom size is about 5 by 8 feet. This layout often places the bathtub or shower along one wall, the toilet near the same plumbing wall, and the vanity closer to the entrance. This keeps plumbing compact while still allowing enough space for daily use.
A standard layout should include enough toilet clearance, vanity space, shower entry space, and room for doors or drawers to open. Plumbing efficiency is important, but the room must also feel comfortable.
Toilet Plumbing Diagram Basics
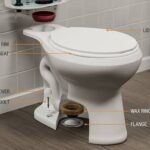
The toilet is one of the most important fixtures in the bathroom because it uses the largest drain. A toilet connects to a closet flange at the floor. A wax ring or approved seal sits between the toilet and the flange to prevent leaks and odors. Below the flange, a 3-inch or 4-inch drain pipe carries waste away.
The toilet also needs a cold water supply line and a shutoff valve. The shutoff valve is usually placed behind or beside the toilet.
Toilet placement should be planned carefully. A common rule is to allow at least 15 inches from the toilet centerline to a side wall or nearby fixture. About 24 inches of clear space in front of the toilet is also commonly recommended or required. More space is better when possible.
Moving a toilet can be expensive because the large drain pipe must be routed correctly. It may need to pass around floor joists, through walls, or down into a basement or crawlspace. A plumber should always review toilet relocation plans.
Sink and Vanity Plumbing Diagram Basics
A bathroom sink usually has a hot water supply line, cold water supply line, shutoff valves, drain pipe, P-trap, trap arm, and vent connection. These parts are often hidden inside the vanity cabinet or behind the wall.
Small bathroom vanities may be 20 to 30 inches wide, while larger bathrooms may use wider single vanities or double vanities. A double vanity needs more planning because two sinks may share drain and vent connections.
Common sink problems include slow drainage, leaks under the cabinet, bad smells, and trap clogs. A diagram can help identify where the P-trap, trap arm, vent, and branch drain are located.
Shower Plumbing Diagram Basics
A shower plumbing layout includes hot and cold supply lines, a mixing valve, shower riser, shower head, shower drain, P-trap, and vent connection. If the shower has a handheld sprayer, rain head, body sprays, or a diverter, the supply layout may be more detailed.
The shower drain is very important. Water must flow toward the drain without pooling. The shower floor needs proper slope, and the drain must connect to a trap and vent. Poor drain placement, weak waterproofing, or incorrect floor slope can lead to leaks and water damage.
Common shower drain styles include point drains and linear drains. A point drain is usually round or square and may be placed near the center or side of the shower. A linear drain is long and narrow and is often used in modern walk-in showers.
Recurring shower clogs may be caused by hair and soap buildup, but if the problem keeps coming back after cleaning, the issue may involve pipe slope, venting, or poor drain design.
Bathtub Plumbing Diagram Basics
A bathtub usually needs hot and cold water supply lines, a tub filler, overflow drain, main tub drain, P-trap, and vent connection. A tub-shower combination also needs a shower riser, shower head, and diverter.
A standard bathtub is often about 60 inches long and 32 inches wide, although sizes vary. The framed opening must be accurate. Measurements should consider the rough framing as well as finished surfaces such as drywall, backer board, waterproofing, and tile.
If the opening is too small, the tub may not fit. If it is too large, sealing the edges can become difficult. This is why the bathtub should be planned before the walls are finished.
Ensuite and Small Bathroom Plumbing Layouts
Ensuite and small bathrooms often need smart plumbing layouts because space is limited. These bathrooms may include a toilet, vanity, and shower, or they may be simple powder rooms with only a toilet and sink.
In compact bathrooms, placing fixtures on one shared plumbing wall is often the best option. This reduces long pipe runs and keeps the room easier to build. However, spacing still matters. The toilet needs enough side and front clearance. The vanity must allow cabinet doors and drawers to open. The shower needs enough entry space.
A small bathroom can still work well when the diagram is planned carefully. The key is to balance comfort, code requirements, and practical pipe routing.
Bathroom Fixture Spacing and Clearances
A good bathroom layout must leave enough room around each fixture. Plumbing can be technically correct, but the bathroom may still feel cramped if the spacing is poor.
The toilet usually needs at least 15 inches from its centerline to a side wall or nearby fixture. Around 24 inches of clear space in front of the toilet is commonly recommended or required. A vanity should have enough space for people to stand comfortably and open drawers. A shower should have safe entry and enough room to move.
Finished wall thickness also matters. Drywall, tile backer board, waterproofing, and tile can reduce the final room size. A plan that looks perfect during framing may become too tight after finishes are installed.
Common Bathroom Plumbing Materials
Bathroom plumbing may use different materials for different jobs. PEX is common for modern water supply lines because it is flexible and easy to install. Copper is strong, durable, and common in many older homes. CPVC may be used for supply lines in some areas.
PVC is common for drain, waste, and vent pipes because it is lightweight and easy to work with. ABS may also be used in some regions. Cast iron is quieter than plastic drain pipe, but it is heavy and usually requires professional installation. Brass is often used for valves and shutoff parts.
The best material depends on local code, budget, building type, water conditions, and the existing plumbing system.
How to Read a Bathroom Plumbing Diagram
To read a diagram, start with the fixtures. Find the sink, toilet, shower, bathtub, bidet, or floor drain. Then look for the water supply lines. These lines usually connect to faucets, shower valves, tub fillers, and toilet tanks.
Next, trace the drain lines from each fixture toward the branch drain or main stack. The toilet drain should usually be larger than the sink or shower drain. After that, find the vent lines. These usually rise upward and connect to a vent stack or roof vent.
Finally, check the notes. A detailed diagram may include pipe size, slope, trap location, shutoff valve location, and cleanout access. These details are important because the drawing alone may not show everything needed for installation.
Bathroom Plumbing Diagram for Troubleshooting
A bathroom plumbing diagram can help you understand where problems may be coming from. If the sink drains slowly, the issue may be in the P-trap, trap arm, vent, or branch drain. If the shower keeps clogging, the problem may be hair buildup, poor slope, or a deeper drain issue.
If the toilet bubbles when the sink or shower drains, the system may have a venting problem or a partial clog. If the bathroom smells like sewer gas, a trap may be dry, a seal may have failed, or the vent system may not be working correctly.
A diagram does not replace a plumber, but it helps you explain the symptoms and understand the possible causes.
DIY Bathroom Plumbing vs Licensed Plumbing Work
Some simple bathroom tasks may be DIY-friendly, depending on local rules. These may include cleaning a P-trap, replacing a shower head, changing a faucet aerator, or replacing a toilet seat.
However, major plumbing work should usually be handled by a licensed plumber. This includes moving a toilet, changing drain lines, adding vents, installing a shower drain, cutting into main pipes, adding a bathroom, or changing hidden plumbing inside walls and floors.
Plumbing mistakes can cause leaks, mold, sewer gas problems, water damage, and failed inspections. A diagram is useful for planning, but professional installation is important for safety and code compliance.
Bathroom Plumbing Diagram Checklist
Before starting a bathroom project, review the full plan carefully. Make sure each fixture has enough clearance. Check that supply lines can reach the sink, toilet, shower, tub, or bidet. Confirm that drain pipes have the correct size and slope. Make sure each sink, shower, and tub has a proper trap. Check that vents are included and placed correctly.
Also review the floor and wall structure. A toilet drain may not fit where you want it if joists are in the way. A shower drain must work with the floor slope and waterproofing. A bathtub needs accurate framing. A vanity needs enough cabinet space for pipes and shutoff valves.
Good planning before construction helps avoid costly repairs later.
Expert Safety Note
This guide is for general education and planning. Plumbing codes vary by location, and final pipe sizes, vent rules, materials, and fixture clearances may differ from one area to another. Always check local plumbing codes and hire a licensed plumber for major plumbing work, especially if the project involves drains, vents, toilet relocation, shower installation, or hidden wall plumbing.
Frequently Asked Questions About Bathroom Plumbing Diagram
A bathroom plumbing diagram is a drawing that shows how bathroom fixtures connect to water supply lines, drain pipes, vent pipes, traps, valves, and the main drain system. It helps with remodeling, installation, repairs, and troubleshooting.
You need one before remodeling because it helps you see whether your planned fixture layout can work with the existing pipes. It can prevent slow drains, poor venting, hidden leaks, bad odors, and expensive changes after construction starts.
The main parts are hot and cold water supply lines, drain lines, vent pipes, P-traps, shutoff valves, fixture connections, cleanouts, and the main drain or stack.
Many bathroom sink drains use 1.5-inch pipe. However, the correct size depends on the fixture, local plumbing code, and the full drain layout.
A toilet drain is usually 3 inches or 4 inches. Toilets need larger drain pipes because they carry solid waste and more water than sinks or showers.
Many shower drains use 2-inch pipe. The shower drain should also connect to a trap and vent, and the shower floor must slope correctly toward the drain.
A wet wall is a wall that contains plumbing pipes, such as water supply lines, drain pipes, vent pipes, or the main stack. Keeping fixtures near the wet wall can make the plumbing layout simpler and more affordable.
Yes, bathroom drains usually need proper venting. Vents help balance air pressure, support smooth drainage, and prevent sewer gases from entering the room.
Gurgling can happen because of poor venting, partial clogs, blocked drain lines, or incorrect pipe slope. If more than one fixture gurgles, the main drain or vent system may need inspection.
A toilet and shower may connect to the same branch drain in some layouts, but the system must be designed with the correct pipe size, slope, and venting. Local plumbing code determines what is allowed.
Yes, you can draw a simple diagram for planning. Include the sink, toilet, shower, bathtub, supply lines, drain lines, traps, and vents. For real installation, have a licensed plumber review the final plan.
Yes, moving a toilet can be difficult because it uses a large drain pipe that must connect correctly to the main drain and vent system. It may also require floor, wall, or ceiling changes.
The best layout usually keeps the sink, toilet, shower, and bathtub close to the wet wall. This reduces pipe runs, lowers costs, and makes the system easier to maintain.
Yes, hire a licensed plumber for major work such as moving drains, changing vents, relocating toilets, installing shower drains, or adding a new bathroom. This helps protect your home and keeps the work code-compliant.
Conclusion
A bathroom plumbing diagram is one of the most important tools for planning a safe, functional, and reliable bathroom. It shows how water supply lines, drain pipes, vent pipes, traps, valves, and fixtures connect behind the walls and under the floor.
The best bathroom layouts keep fixtures close to the wet wall, use proper pipe sizes, maintain correct drain slope, include proper venting, and leave enough clearance around each fixture. They also account for wall thickness, floor framing, shower waterproofing, and local code requirements.
Whether you are planning a small vanity update or a complete bathroom remodel, start with a clear diagram. It can help prevent mistakes, reduce costs, improve communication with your plumber, and keep your bathroom working properly for years.